by Mizage
For support, contact support@mizage.com
Table of Contents
Introduction
The Problem
Managing open windows on Microsoft Windows can be frustrating, requiring precision control of your mouse or trackpad for clicking, dragging, pushing and pulling your windows to the size and position you desire. Even with all this work, it’s very difficult to get windows exactly where you want them, so most of the time windows are left scattered all over the screen.
The Solution
Divvy is an entirely new way of managing your windows. It allows you to quickly and efficiently “divvy up” your screen into exact portions. This lets you take maximum advantage of your screen real estate without any hassle at all. Window management has never been this easy.
With Divvy, it’s as simple as a click & drag in the Divvy interface and your window will be resized and moved to a relative portion of the screen. If that seems like too much work, you can go ahead and create as many different shortcuts as you'd like that resize and move your windows.
Divvy is designed to be quick, simple and elegant, staying out of your way as much as possible while providing the most powerful window management available.
Getting Started
For a quick start introduction to Divvy, watch the short video on our website http://mizage.com
Launching Divvy
When Divvy launches, you’ll notice it appear in the system tray as the forked arrow icon.

Divvy is designed to run in the background at all times so you can quickly and easily access Divvy when you need to manage your windows.
The Divvy Interface
Activate the Divvy interface by either:
- Clicking the Divvy icon in the system tray
- Pressing the user-assigned global keyboard shortcut
- Re-launching the application (only one instance of Divvy runs at a time, so simply launching Divvy again from the Start Menu or the Explorer will bring the Divvy panel up for you)
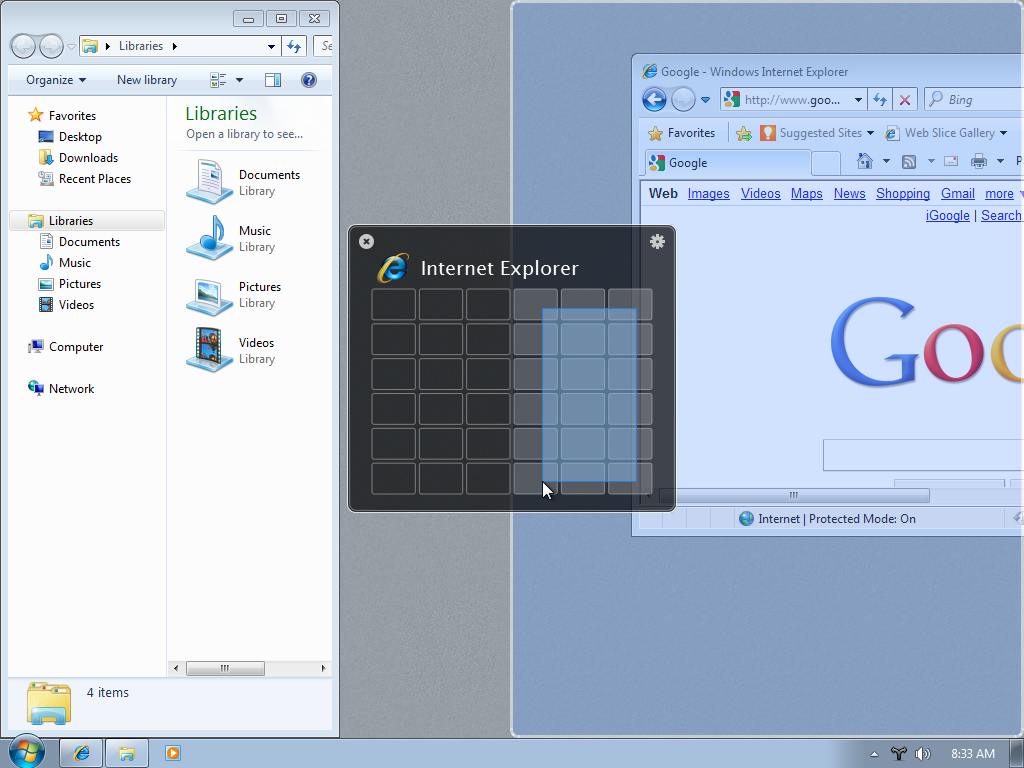
The Divvy interface (aka the Divvy panel) will appear in the center of your screen. If you have more than one screen, a Divvy panel will appear on each of your screens.
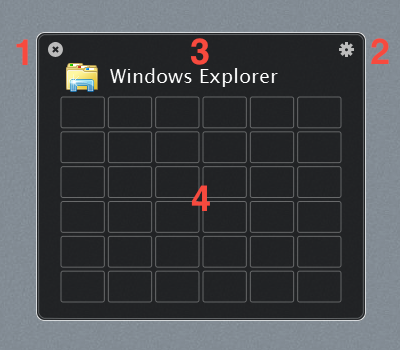
The Divvy panel consists of:
- A button to dismiss the panel
- A button to flip to the Divvy Preferences
- The icon and name of the active application
- The Grid for selecting an area of your screen
Moving Your First Window
Using Divvy is as simple as:
- Click on the window you want to resize
- Activate Divvy
- Use the mouse to click and drag, selecting boxes in the Grid according to where you want the window to be moved and resized on screen
The window will then be moved and resized to fit your screen in proportion to your selection in the Grid and the Divvy panel will automatically dismiss.
For example, if "Keep panel open until dismissed" is disabled and you hold the Shift key while selecting in the Grid, the Divvy panel will stay open so you can resize another window without having to activate Divvy again.
Divvy In-Depth
The Grid
The default 6x6 grid size was chosen because it allows you to put two windows side by side (split screen) or three windows side by side by side. However, we realize you may require more control over the Grid to better utilize your screen real estate, so we have made the Grid easily configurable.
Add or Remove Rows and Columns from the Grid
You can add or remove rows and columns from the Grid on the fly. You can also configure a default grid size that will be shown whenever you activate the Divvy interface or create a new Shortcut (see Appearance Preferences below).
You can add rows and columns up to a maximum of 10x10 (which can be subdivided to 20x20). You can remove rows and columns to a minimum of 1x1 (which is essentially fullscreen).
| Operation | Keyboard Shortcut |
|---|---|
| Add a row | Alt + Plus |
| Remove a row | Alt + Minus |
| Add a column | Alt + Shift + Plus |
| Remove a column | Alt + Shift + Minus |
Subdivide the Grid
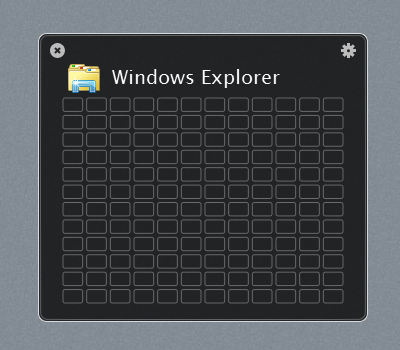
Press the Alt key to instantly subdivide the grid for finer control over your window placement.
For example, subdivide the default 6x6 grid to get a 12x12 grid. Press the Alt key again to revert back.
Multiple Screens (Monitors)
Divvy is designed to support your multi-monitor workflow. When you activate Divvy, the Divvy panel will appear on each of your screens. This allows you to move/resize windows on any screen you choose, even if that window isn’t currently on that screen.
Shortcuts
Divvy allows you to create an unlimited number of shortcuts. A shortcut is simply a grid selection and a key combination for quickly applying that grid selection to a window.
There are two types of Divvy shortcuts: Local and Global. Here’s a table to explain the differences:
| Local Shortcut | Global Shortcut |
|---|---|
| Active only when Divvy panel is showing. | Active at all times, in all applications (as long as Divvy is running). |
| Slower to use because you must activate Divvy first. | Quicker to use because the shortcut is always available. |
| Simple. Can be as short as a single character or be combined with modifier keys. No risk of a shortcut colliding with a shortcut used in other applications. | More complex. Must be combined with modifier keys. Each shortcut runs the risk of colliding with shortcuts used in other applications. Care must be taken to prevent collisions, as Divvy cannot detect them. |
Preferences
General Preferences
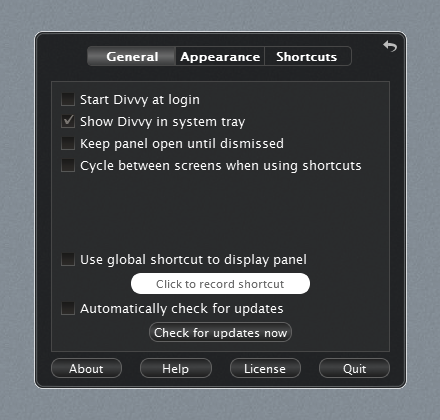
To access the Divvy General Preferences, activate the Divvy panel, then click the gear button in the upper-right corner of the Divvy panel, then click the “General” tab.
| Setting | Description |
|---|---|
| Start Divvy at login | When enabled Divvy will start automatically whenever you login or restart your computer. Default: disabled |
| Show Divvy in the system tray | Show the Divvy icon in the system tray. If you prefer to access Divvy via the user configurable global keyboard shortcut (see below), you can use this option to disable the system tray icon. Default: enabled |
| Keep panel open until dismissed | By default, the Divvy panel will automatically dismiss after you make a grid selection. If you frequently resize more than one window, try enabling this option to keep the panel open after a grid selection (see below). Note: To dismiss the Divvy panel simply press the Esc key, click the close button in the upper-left, or press the global keyboard shortcut. Default: disabled |
| Cycle between screens when using shortcuts | When enabled, you can press a shortcut multiple times to cycle the window from one screen to the next, through all your screens. This option works for global shortcuts as well as local shortcuts, but local shortcuts require that you also enable the “Keep panel open until dismissed” option. Otherwise, the shortcut will be applied to the screen on which the window currently resides. Default: disabled |
| Use global shortcut to display panel | A user-assignable global keyboard shortcut for displaying and dismissing the Divvy interface. Default: disabled and shortcut unassigned |
| Automatically check for updates | Enable this option to be notified when there’s a new version of Divvy available (recommended). Default: enabled |
Appearance Preferences
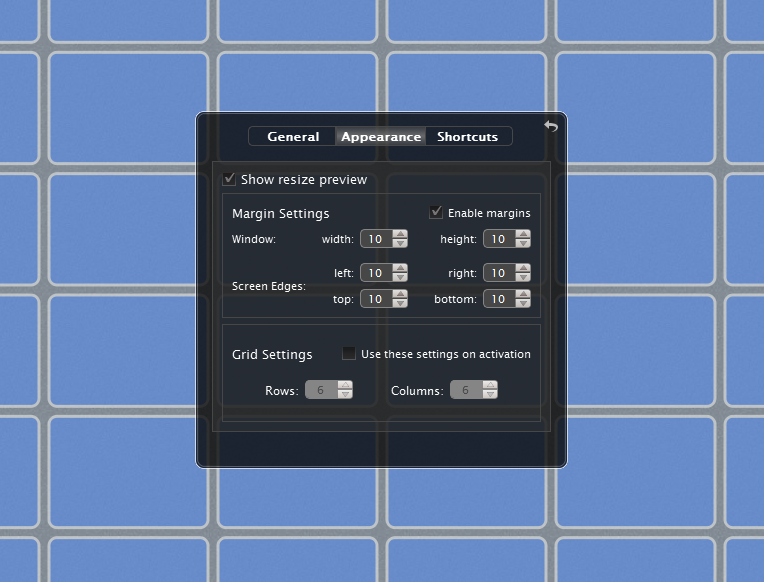
To access the Divvy Appearance Preferences, activate the Divvy panel, then click the gear button in the upper-right corner of the Divvy panel, then click the “Appearance” tab.
| Setting | Description |
|---|---|
| Show resize preview | As you hover over the Divvy grid, you will see a blue preview square that assists you in the placement of your window. Also, as you drag a selection on the grid, the preview will update to represent where the window will be placed when you finish your selection. Default: enabled |
| Margin Settings | |
| Enable margins | Enable this option to use margins which allows you to control the space around the edges of your screen and between windows. Default: disabled |
| Window (width, height) | Control the space (in pixels) between windows that are resized with Divvy. The live preview allows you to immediately see the effects of your margin settings on the grid. Default: 10 Range: 0-300 |
| Screen Edges (left, right, top, bottom) | Control the space (in pixels) around the screen edges and windows that are resized with Divvy. The live preview allows you to immediately see the effects of your margin settings on the grid. Default: 10 Range: 0-300 |
| Grid Settings | |
| Use these settings on activation Rows & Columns |
Enable this option to force the Divvy grid to always default to the provided Rows and Columns when the Divvy panel is shown. If you add/remove rows & column to the grid on the fly, those changes will be reverted to these Grid settings every time the panel is shown. Default: disabled, 6 & 6 |
Shortcuts Preferences
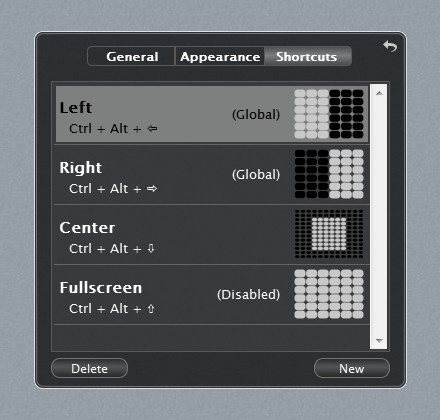
To access the Divvy Shortcuts Preferences, activate the Divvy panel, then click the gear button in the upper-right corner of the Divvy panel, then click the “Shortcuts” tab.
Create a New Shortcut
To create a new shortcut, click the “New” button at the bottom of the Shortcuts Preferences to be presented with a new blank shortcut as seen below:
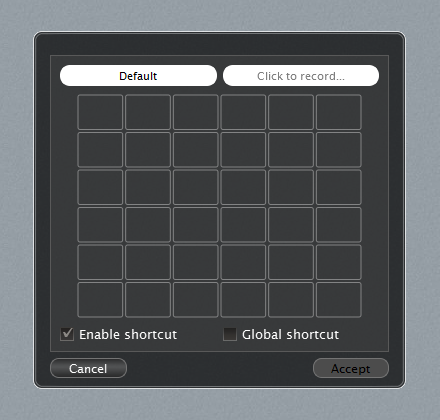
- Start by entering a name for this shortcut, this is used to help you identify the shortcut in the Shortcuts list, but is not required.
- Decide if you want this shortcut to be Local or Global and check the “Global Shortcut” box if needed.
- Enter a keyboard shortcut and Divvy will let you know if there are any obvious conflicts with your choice.
- Adjust the Grid if you want, adding/removing row/columns as desired and/or subdivide the Grid for more precise control.
- Drag out your selection on the Grid.
- Click “Accept” if you’re satisfied with this shortcut or “Cancel” to return to the Shortcut Preferences without creating the shortcut.
Edit a Shortcut
To edit a shortcut, double-click the shortcut in the Shortcuts Preferences. This will present you with a view where you can modify the settings for this shortcut. Click “Accept” if you’re satisfied with this shortcut or “Cancel” to return to the Shortcut Preferences without modifying the shortcut.
Delete a Shortcut
To delete a shortcut, select the shortcut in the Shortcuts Preferences and either click the “Delete” button at the bottom or press the Delete key on your keyboard.
Licensing
- To purchase a license, please visit the Mizage online store at https://store.mizage.com
- For questions relating to what a license covers, see the FAQ at https://store.mizage.com or contact sales@mizage.com
To apply a Divvy license:
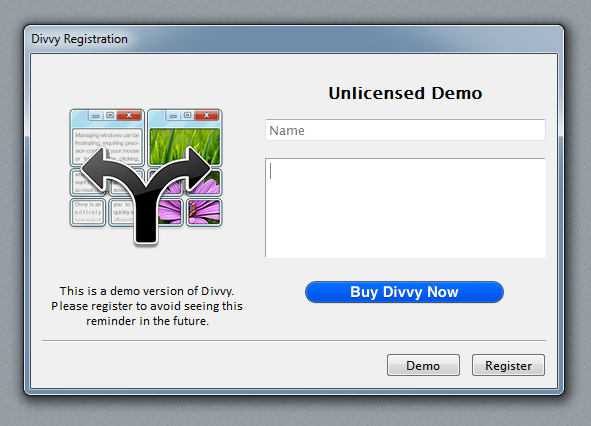
- Open the Divvy preferences then click the “License” button at the bottom. This will show the Divvy Registration window.
- Enter your name in the first field exactly as it appears in the license email.
- Copy & paste your license key into the large box below the name field.
- Click the “Register” button and you will be informed if the process was successful.
Contact support@mizage.com if you require any assistance.
Troubleshooting
Window Does Not Respond to Divvy
Some windows may not move/resize when you attempt to use Divvy on them. For example, windows for programs that are running with escalated privileges, such as programs ran in Compatibility mode, programs ran as another user (i.e. Administrator), or windows that appear after a User Account Control (UAC) dialog.
To resize these windows, quit Divvy and try running Divvy as Administrator:
Appendix
Primer on Keyboard Shortcuts
A keyboard shortcut is a single key (e.g. A, 1, /, F2, etc.) combined with modifier keys (Shift, Ctrl, Alt, or Win). So when you see a shortcut like Alt + Shift + A, this means to hold the Alt key and the Shift key then press the A key, then finally, release all keys.
Reserved Shortcuts
Many shortcuts involving the Windows (Win) or Ctrl modifier keys are reserved by the system and cannot be used as a Divvy shortcut. You can find a partial listing below and an exhaustive list on microsoft.com.
| Shortcut | Reserved by Windows to… |
|---|---|
| Win + D | show the Windows desktop. |
| Win + E | open My Computer in Explorer. |
| Win + F | search for files or folders. |
| Win + Shift + F | show search for computers. |
| Win + L | lock up the PC. |
| Win + M | minimize all running application. |
| Win + Shift + M | restore all minimized application. |
| Win + R | show the Run window. |
| Win + U | show the Utility Manager. |
| Win + F1 | show the Windows Help. |
| Win + Tab | cycle through buttons on the taskbar. |
| Win + Break | show the System Properties window. |
| Ctrl + Alt + Delete | show the Windows Task Manager. |
| Alt + Tab | switch to the next running application. |
| Shift + Alt + Tab | switch to previous running application. |
Windows System Tray
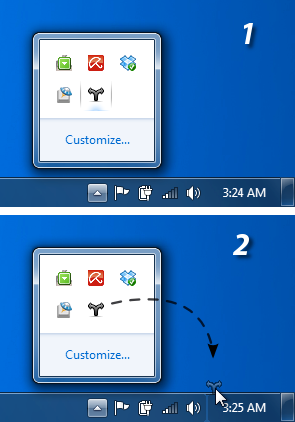
Starting in Windows 7, all non-system tray icons are hidden in the “Notification Area Overflow” box by default. This means more clicks for you just to get to the Divvy icon!
To permanently place the Divvy icon where you can get at it, first make sure that Divvy is running, then follow the following two steps:
- Click on the upward-facing arrow next to the system notification icons to open the “Notification Area Overflow” box.
- Drag the Divvy icon down to the system tray.
Now whenever Divvy is running, the system tray icon will appear exactly where you placed it, for easy clicking access.
